Hide-my-email aliases
- Lettura
- 10 minuti
- Categoria
- Email aliases
With Proton Pass and Proton Mail, you can create throwaway email addresses that forward incoming messages to your personal mailbox.
Hide-my-email aliases let you receive emails from websites without them knowing your primary email address. This makes it easier to protect your online identity, filter (or unsubscribe from) spam emails, and avoid your real details being leaked in a data breach.
You can create up to 10 aliases with Proton Free and Mail Plus. For unlimited aliases, upgrade to Pass Plus or Proton Unlimited.
Learn more about how Hide-my-email aliases can protect you(nuova finestra)
In this article
- How it works
- Create and manage aliases
- Android
- iOS
- Desktop (browser extension)
- Proton Mail (web)
- Send an email from an alias address
- Add additional forwarding mailboxes
- Create aliases with a custom domain address
- Sync SimpleLogin aliases to Proton Pass
- Why use an email alias?
How it works
When you sign up for an online account, you can use Hide-my-email aliases to share a randomized address instead of entering your personal email address.
When a sender writes to this address, the message goes to Proton servers first. Proton then forwards the message directly to your mailbox. The sender never sees your personal email address.
If you reply to a forwarded message, Proton hides your real address and sends the reply from your alias.
Create and manage aliases
Android
The screenshots in these guides were taken on a Samsung One UI device. The exact steps may differ slightly depending on your device and Android version.
Create an alias
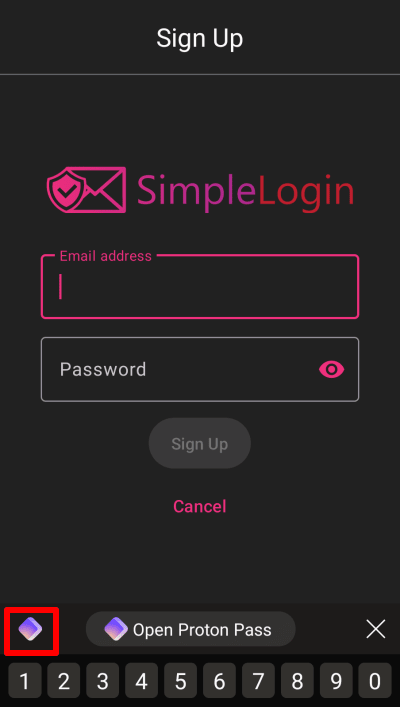
- Open the website or app where you want to create an account. We’re using SimpleLogin as an example.
- Tap the email input box and select the Proton Pass icon.
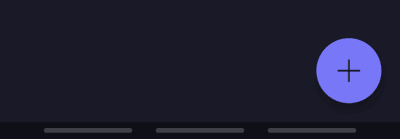
- Tap the + button at the bottom right of the screen.
- Tap the Username field, then select Hide my email.
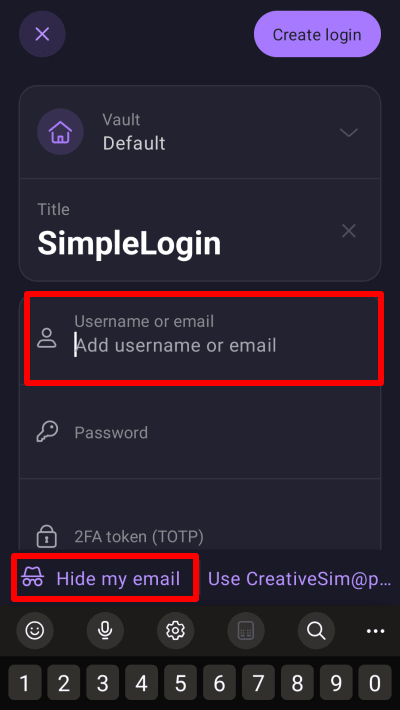
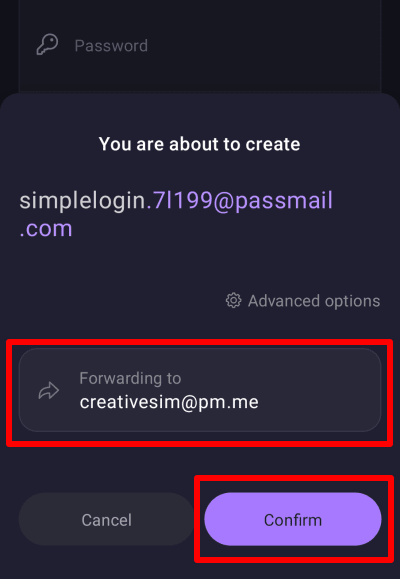
5. This will generate an alias address for you. Tap Confirm to create the alias.
6. Tap the Password field and Generate a new password for the website you’re signing up to.
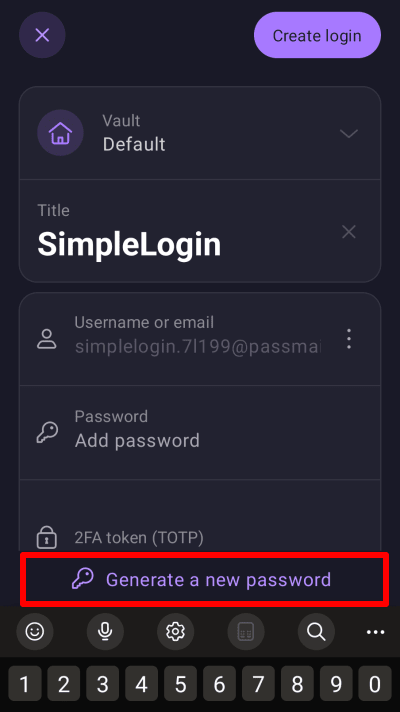
7. Before you save your alias, you can optionally:
- Edit the Title (the name you’ll see for this alias in Proton Pass)
- Move your alias into a different Vault
- Add a Note
- Configure two-factor authentication (2FA)
8. Tap Create login when you’re done. This will return you to the app or webpage of the service you created an alias for with your login details autofilled.
Edit alias details
This guide explains how to change the forwarding address, title, and note for an alias. You can’t edit the alias address itself.
1. Open Proton Pass and find the alias you want to make changes to.

2. Tap the alias, then select Edit.
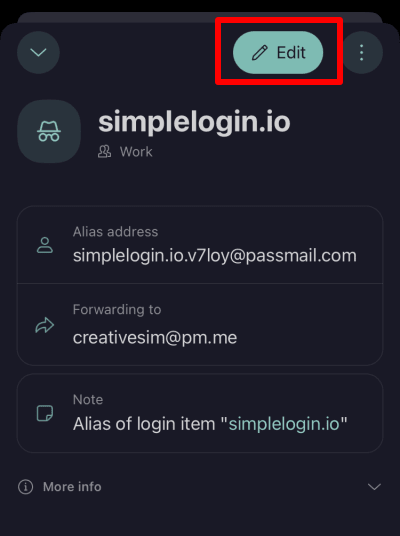
3. Edit the Title, Note, or Forwarded to fields as needed. Tap Save when you’re done.
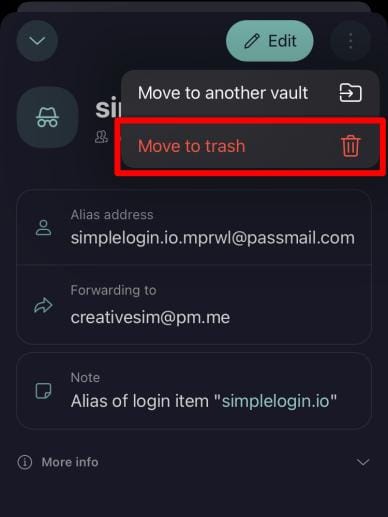
Disable or delete an alias
- Disabling an alias deactivates it temporarily, so it can’t receive emails or forward them to your mailbox.
- Deleting an alias removes it permanently from your vaults, so it can’t be recovered.
- Open the Proton Pass app.
- Find the alias you want to disable or delete. Tap the More options (three vertical dots) icon next to it.
- Tap Move to Trash.
- Now tap the Proton Pass icon to open the side menu. Select Trash.
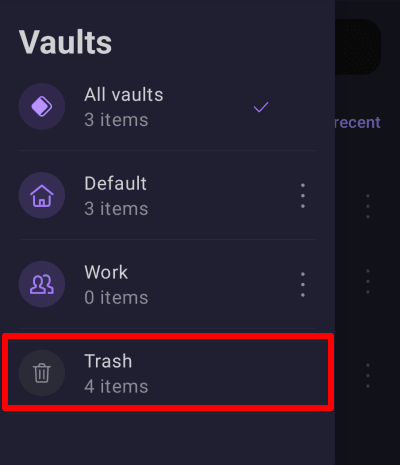
5. Find the alias. Tap More options (three vertical dots icon) and select Delete permanently.

- To temporarily disable your alias, select Disable instead: this will deactivate your alias without deleting it.
- To permanently delete your alias, select Delete it, I will never need it: This will permanently delete your alias.
iOS
Create an alias
- Open the website or app where you want to create an account.
- Tap the email address field, then tap Passwords.

3. Tap Create login.

4. Tap the Username field, then select Hide my email.

5. This will generate an alias address for you. Tap Confirm to create the alias.

6. Tap the Password field and Generate a new password for the website you’re signing up to.

7. Before you save your alias, you can optionally:
- Edit the Title (the name you’ll see for this alias in Proton Pass)
- Move your alias into a different Vault
- Add a Note
- Configure two-factor authentication (2FA)
8. Tap Create & AutoFill when you’re done. This will return you to the app or webpage of the service you created an alias for with your login details autofilled.
Edit an alias
This guide explains how to change the forwarding address, title, and note for an alias. You can’t edit the alias address itself.
1. Open Proton Pass and find the alias you want to make changes to.
2. Tap the alias, then select Edit.

3. Edit the Title, Note, or Forwarded to fields as needed. Tap Save when you’re done.
Disable or delete an alias
Disable an alias:
This deactivates your alias, so it can’t receive emails or forward them to your mailbox. You can turn it back on at any time.
- Open Proton Pass.
- Find and select the alias you want to disable.
3. Turn the toggle off.
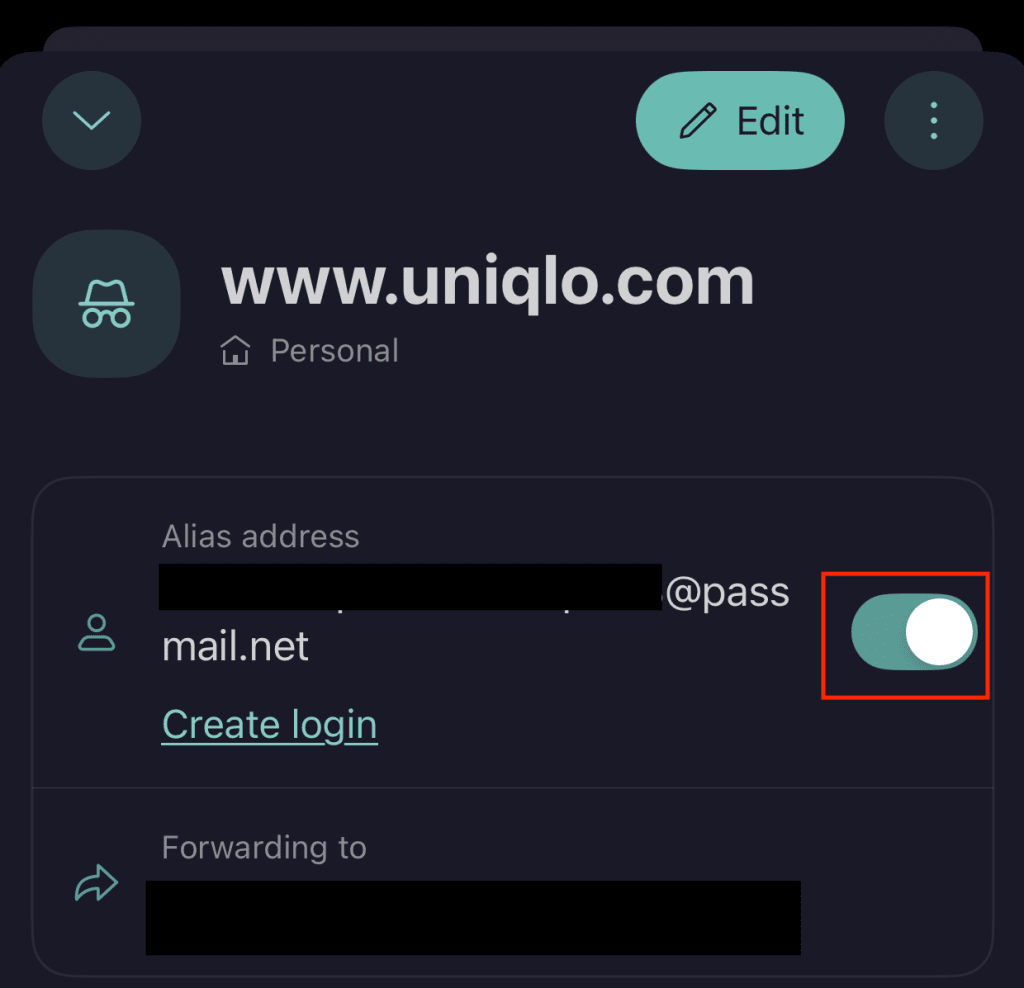
Your alias is now disabled.
Delete an alias
This permanently removes the alias from Proton Pass. Deleted aliases cannot be recovered.
- Open the Proton Pass app.
- Tap the alias you want to delete, then tap the More options (three vertical dots) icon.
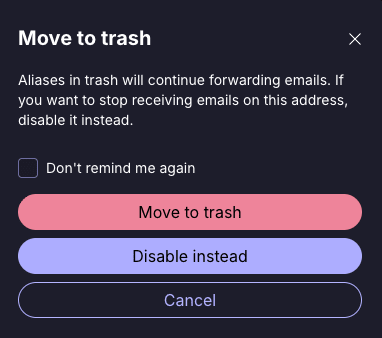
3. Select Move to Trash.

4. A confirmation pop-up will appear. Tap Move to Trash again.

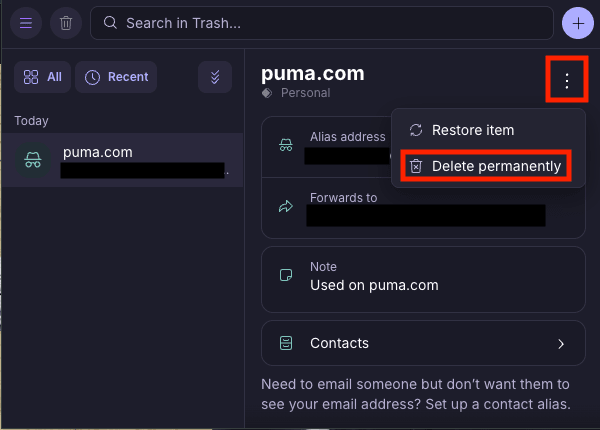
5. Tap the Proton Pass icon (top left corner) and select Trash.

6. Select the alias you want to delete and tap the More options (three vertical dots) icon.
7. If you’re sure you want to delete the alias, select Delete permanently.

Your alias is now permanently deleted.
Desktop (browser extension)
You’ll need the Proton Pass browser extension to create new aliases from your desktop. You can manage existing aliases from both the browser extension and the Proton Pass web app.
Create an alias
- Go to the website where you want to create an account. Click the email address field.
- The Proton Pass logo will appear inside the field. Click the logo and select Hide my email from the menu.
This will create and autofill a new alias address.
For more customization options, create your alias directly in the browser extension:
- Open the extension and click + (Add new icon).
- Select Alias from the menu.
- Click Create alias.
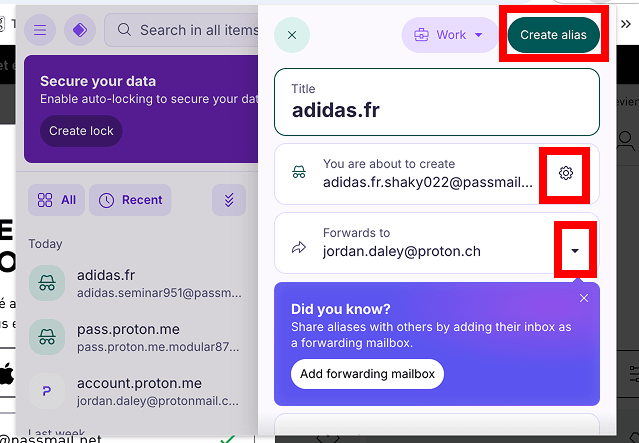
From here you can:
- Edit the Title (the name you’ll see for this alias in Proton Pass)
- Move your alias into a different Vault
- Add a Note
- Configure two-factor authentication (2FA)
Edit an alias
This guide explains how to change the forwarding address, title, and note for an alias. You can’t edit the alias address itself.
- Open the browser extension and select the alias you want to edit.
- Click Edit.

3. Edit the Title, Note, or Forwarded to fields as needed.
4. Click Save when you’re done.

Disable or delete an alias
Disable an alias
This deactivates your alias, so it can’t receive emails or forward them to your mailbox. You can turn it back on at any time.
- Open the Proton Pass browser extension.
- Click on the alias you want to disable and turn the toggle off.

Delete an alias
This permanently removes the alias from Proton Pass. Deleted aliases cannot be recovered.
- Open the Proton Pass app.
- Select the alias you want to delete, then click the More options (three vertical dots) icon.
3. Select Move to Trash.
4. A confirmation pop-up will appear. Click Move to Trash again.
5. Click the Proton Pass icon (top left corner) and select Trash.

6. Select the alias you want to delete and click the More options (three vertical dots) icon.
7. If you’re sure you want to delete the alias, select Delete permanently.
Proton Mail web app
You can also create Hide-my-email aliases in the Proton Mail web app. Once created, you can view and manage these aliases in Proton Pass.
How to create an alias in Proton Mail
Send an email from an alias address
If you’re on a paid Proton Pass, Proton Workspace, or Proton Visionary plan, you can start an email conversation from an alias address.
This means you can message someone without them knowing your real email address, even if they don’t message you first.
Before sending, you need to add them as a contact for that alias. Contacts are not shared across aliases.
- Sign in to pass.proton.me(nuova finestra).
- Select the alias you’d like to send from, then click Contacts.

3. Click Create contact.

4. Enter your contact’s email address, then click Save.

5. To send an email, select the email icon next to the contact. Your default email client will open with the message pre-addressed.

Add additional forwarding mailboxes
By default, Proton forwards emails sent to your aliases to your primary mailbox.
If you’re on a paid Proton Pass, Proton Workspace, or Proton Visionary plan, you can add multiple forwarding mailboxes for each alias:
- Sign in to pass.proton.me(nuova finestra) and go to Settings → Aliases.

2. Select Add mailbox.

3. Enter the email address you want to add as a forwarding address. Select Continue.

4. We’ll send a verification code to your email address. Enter the code and click Confirm.
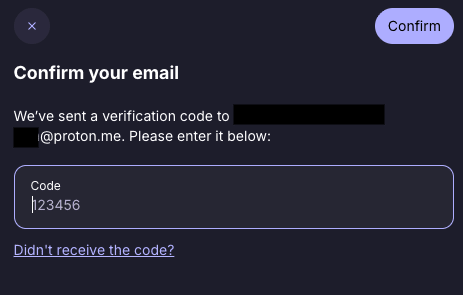
Your new forwarding mailbox is now set up. Now you can either:
- Connect this mailbox to an individual alias: Edit the alias itself. You can do this in the Proton Pass browser extension, iOS app, or Android app.
- Make this your default forwarding mailbox for all aliases: Open the Actions (three vertical dots) menu and select Make default.
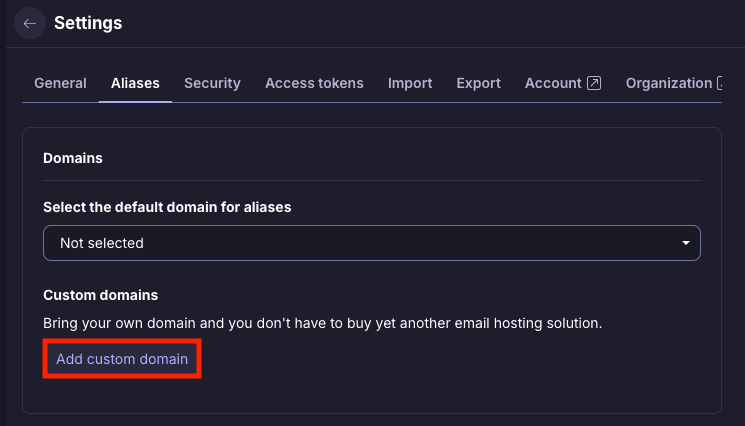
Create aliases with a custom domain address
If you’re on a paid Proton Pass, Proton Workspace, or Proton Visionary plan, you can add up to 10 personal domains to your Proton Pass account and use them to create alias addresses like [email protected].
Note: You can’t use the same domain for Proton Mail and Proton Pass at the same time. If you’re already using your custom domain for Proton Mail, you will see a “Failed to create domain” error when you try to add it to Proton Pass.
- Sign in to pass.proton.me(nuova finestra) and go to Settings → Aliases.
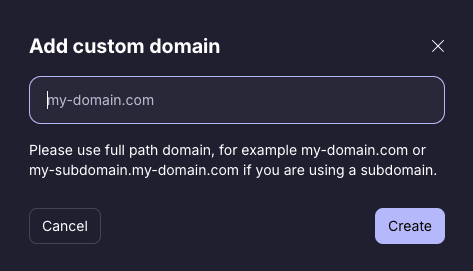
2. Select Add custom domain.
3. Enter your domain name and select Create.
4. Open the Info tab. Here, you’ll see the DNS records you’ll need to add to your domain provider’s website.
- Must add: TXT records, MX records
- Optional, but recommended: DKIM, SPF, and DMARC records


5. Go back to the Aliases page. Select the three dots ( ⋯ ) icon next to your domain and Check the DNS verification status. DNS records can take a few hours to update.
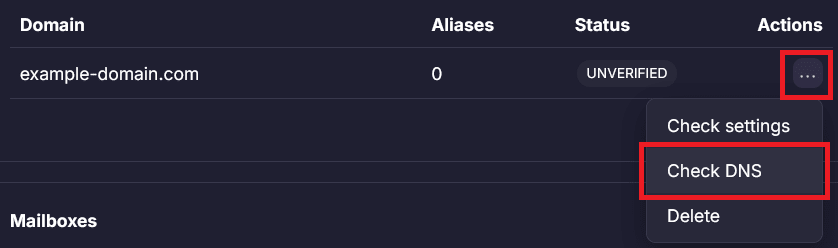
6. Once verified, you’ll be able to use your custom domain for your aliases.

Sync SimpleLogin aliases to Proton Pass
If you have existing aliases in SimpleLogin, you can sync them to Proton Pass.
Once enabled, this change is permanent and cannot be reversed.
- Sign in to pass.proton.me(nuova finestra) and go to Settings → Aliases.
- Turn the SimpleLogin sync toggle on.
Why use an email alias?
With an alias, you don’t need to give your real email address to online services you use. This allows you to:
- Make one-off purchases without receiving unwanted emails from the service.
- Prevent online trackers from being able to see which accounts you’ve signed up for.
- Make use of a free trial without receiving endless emails encouraging you to sign up for the paid service afterward.
- Reduce the overall volume of spam emails in your inbox.
Using aliases can also be more secure. When you have different email addresses for different accounts, it makes credential stuffing attacks(nuova finestra) (using passwords from one website to crack accounts on other websites) much harder to execute.
With Proton Pass, you can create unique aliases for every web service. Once you no longer wish to receive emails from that service, just delete or deactivate the associated alias.